
Sharing ideas for creating meaningful cards and scrapbooks for both the sighted and visually impaired.
Tuesday, September 3, 2013
Wednesday, March 27, 2013
Flutter Card
Hello, friends! Guess what?! I'm writing this while enjoying the absolutely fabulous outdoors!!! I'm sitting on my back porch watching my youngest swing. It is the perfect temperature out here, so I figured I would enjoy it before it gets beastly hot. :o)
I thought I would share a fun butterfly card with y'all! I made this sweet card using the For Always paper pack.

I absolutely love the chevron print paper! I layered Honey card stock that I had embossed over top. Then, on top of that, I layered a frame with the script print paper and the black glitter card stock.

Lots of butterflies make this card super fun! I used Honey card stock layered with silver glitter paper, and a white paper butterfly on top. :o)

I wanted to add a bit of a surprise, so I figured I would use the black tulle ribbon gathered with some white twine. Another paper butterfly sits on top. I really love this card! :o)
Happy Crafting!
Cherri
craftwithfeeling.ctmh.com
Supply List:
- For Always paper pack (X7165B)
- Black & Grey Glitter Paper (Z1829)
- Black Tulle Ribbon (Z1798)
- Baker's Twine Neutral Assortment (Z1701)
- Flutter Paper Shapes (Z1463)
- Art Philosophy Cricut cartridge (Z1686)
- Bling pins (discontinued)
Wednesday, March 20, 2013
Use Your Stash Blog Hop
It's another blog hop!!! Yay!!! This one is a very important one for me. I don't know about you, but I am a hoarder of all things crafty! This time, we were challenged to use something old with something new. If you are coming from Judy Faye's blog, you are on the right track!
I have yet another NON card project to share with you!!! Because today is the official first day of spring, and Easter is nearing, I thought it would be fun to do a little treat box with yummy jelly beans inside. :o) Who can say no to that?

I used the Cricut Artiste cartridge to cut this darling butterfly box out of the old Dotty For You paper. Isn't it fun?!

The blue butterfly was cut with the same cartridge, but I used the new Claire paper for this one. Then, I layered a paper butterfly on top with a bit of 3D foam tape. The bling on the wings adds fun sparkle.

I also used some of our fun black net ribbon!!! I just put a strip of red line tape on it and folded a few gathers into it. I stuck it on the backs of each of the bottom butterfly's wings. :o) I think it will be a fun gift to give.
Very simple, and made very easy with the Artiste!!!
Now, hop your way on to Janet's blog to see more of what can be done with old and new!!!
Happy Crafting!!!
Friday, March 15, 2013
Technique Blog Hop: Black and White
Hello, friends!!! Welcome to another fun blog hop. I really hope you hop all the way through because the creations are just amazing! What talented women!!! Anywhooo....as I said, this is a blog hop, and we are trying a fun technique of using only black and white. If you are coming from Debi's blog, then you are in the right place!
Usually, I make cards. That seems to be my happy place. So, I decided to step out of my box and use the opportunity to make a home decor item. I made a fun wreath using the Close To My Heart 'For Always' paper pack and the black and grey glitter paper.

I discovered that photographing a wreath is much more difficult than a card, so I tried to take several pictures to give you a better idea of what it looks like, really. As always, it is much prettier in real life. :o)

This was my first time making Kumata flowers. I made one big one and two smaller ones. I also cut out the various rolled flowers with the Cricut Artiste cartridge varying in size from 4 inches to 2 3/4 inches.

I used the different glitter paper to create the foliage. I used three different types of leaves in the three different shades of black and grey. Grey is a shade of white, right? :o)

I really wish I had a better picture of this darling rosette! It's my favorite flower of the bunch! I used the chevron pattern to create it, and cut it out at 1 3/4 inches. It turned out so darling!!!

To make the banner, I used the chipboard banner shapes, and cut the paper to cover it using the Cricut Art Philosophy cartridge. I also cut out this cute dragonfly. I thought it would add such a cute touch. I put the glittery layer on with 3-D foam tape, so it gives it dimension. Love it!!! Baker's twine hangs the banner onto the wreath with black roses at each end of the twine.

Here it is hanging on my door. The lighting still isn't right, but like I said...wreaths are hard for me to figure out how to photograph. :o) I hope you have at least an idea of what it looks like! It's sparkly and pretty. Everything should have some sort of glitter, right? LOL
Now, it's time to hop on over to Joy's blog to see what lovely creation she has come up with!!!
Tuesday, February 19, 2013
Upcoming Events
I am so excited to let you all know about my classes for the next few weeks!!! I am really excited about them, and I hope you will join me. We are going to have such a good time!


Studio J Class Thursday, Feb. 21 noon-2pm
I will be doing my first MONTHLY meeting teaching about the online scrapbooking, Studio J. This is a free class, and this month through the 15th of March each layout is ONLY $5!!! Woohoo!!! So, come and let me show you how easy this digital thing can be, AND save some money! You will just need to bring your laptop with you.
Card Class Friday, March 1st 7-9pm
This class is going to be so much fun!!! I designed three very different cards, and I love all of them! I used the new For Always paper from Close To My Heart. This paper is so beautiful and elegant. I love working with it!
Card #1


Card #2

Card #3


This cost is only $20. You will be using different techniques, and have a fun evening hanging out with friends. Remember, space is limited, so don't wait to reserve your spot!
What to bring:
- microtip scissors
- 3D tape
- Glue Dots
- Adhesive
- Needle for threading the twine
- black ink
- Lagoon ink
- White Daisy ink
I hope you like them, and I really hope you can come! :o)
Happy Crafting!
Cherri
469-438-6556
Friday, February 15, 2013
Technique Blog Hop: Alcohol Markers
Hello, and welcome to our technique blog hop!!! This month we are showing the various uses for the new Close To My Heart alcohol ink markers. If you are coming from Debi's blog, you are on the right track. So, without further ado, let me show you what I have done, and what YOU can do with these fun markers!!!
I love making cards, so I came up with another one to show you. I did use the Wishes book for a pattern idea, but I did not use the cutting instructions. Here it is!

So, I started with the new Claire paper pack from Close To My Heart. It's one of those that I wasn't sure I would like until I started playing with it. Now, I LOVE it!!! I cut the stamped paper out at 3 1/2 inches from the really smooth paper I use for Copic markers (I really couldn't say what brand that is, sorry!) I stamped in black Memento ink. This seems to work best for me with no smearing when I color.

I colored the image with Cranberry, Autumn Terracotta, Honey, New England Ivy, and Outdoor Denim markers. I like to begin with the lightest color first, then add the shading with the darker color, and blend them together with the lighter color. I colored the branch with the gold metallic marker. After coloring the image, I distressed the papers with Saddle ink and a sponge. I also stamped the argyle pattern with Saddle ink on the base paper. I cut the rosette with the Artiste Cricut cartridge at 1 inch and added an old golden button from my stash.

Do you see these awesome blue pearls?! Those used to be white!!! I colored them with the markers! Isn't that cool?! You can color any white pearls or clear sparkles with these markers and get them to match whatever you are working on! You can go over them and get them darker, just let them dry between coats for a few seconds.

I cut the flower out at 2 1/2 inches and distressed it with Saddle ink before rolling it up. The ribbon is the Close To My Heart Color Ready ribbon. I squashed my Outdoor Denim and Saddle ink pads onto my craft mat, then sprayed them with alcohol. I ran the ribbon through the inks and crinkled it up and let it dry, I love the worn look it gets by doing that! :o)
Here is the list of supplies I used:
Happy Crafting!
Cherri
I love making cards, so I came up with another one to show you. I did use the Wishes book for a pattern idea, but I did not use the cutting instructions. Here it is!

So, I started with the new Claire paper pack from Close To My Heart. It's one of those that I wasn't sure I would like until I started playing with it. Now, I LOVE it!!! I cut the stamped paper out at 3 1/2 inches from the really smooth paper I use for Copic markers (I really couldn't say what brand that is, sorry!) I stamped in black Memento ink. This seems to work best for me with no smearing when I color.

I colored the image with Cranberry, Autumn Terracotta, Honey, New England Ivy, and Outdoor Denim markers. I like to begin with the lightest color first, then add the shading with the darker color, and blend them together with the lighter color. I colored the branch with the gold metallic marker. After coloring the image, I distressed the papers with Saddle ink and a sponge. I also stamped the argyle pattern with Saddle ink on the base paper. I cut the rosette with the Artiste Cricut cartridge at 1 inch and added an old golden button from my stash.

Do you see these awesome blue pearls?! Those used to be white!!! I colored them with the markers! Isn't that cool?! You can color any white pearls or clear sparkles with these markers and get them to match whatever you are working on! You can go over them and get them darker, just let them dry between coats for a few seconds.

I cut the flower out at 2 1/2 inches and distressed it with Saddle ink before rolling it up. The ribbon is the Close To My Heart Color Ready ribbon. I squashed my Outdoor Denim and Saddle ink pads onto my craft mat, then sprayed them with alcohol. I ran the ribbon through the inks and crinkled it up and let it dry, I love the worn look it gets by doing that! :o)
Here is the list of supplies I used:
- Claire paper pack
- Saddle ink pad
- Outdoor Denim ink pad
- Black Memento ink pad
- Cranberry alcohol ink markers
- Autumn Terracotta alcohol ink markers
- Honey alcohol ink markers
- New England Ivy alcohol ink markers
- Fabulous You stamp set
- Pearl Opaques
- Color Ready seam binding ribbon
- Artiste Cricut cartridge (of course!!!) :o)
- Gold button
Happy Crafting!
Cherri
Thursday, February 14, 2013
Flutter Card
Hey, peeps!!! Happy Valentine's day!!! :o) I really love this time of year. It seems to inspire craftiness in everybody, even boys! LOL I had an open house last Saturday (I'm sorry if you didn't get an invite...I am still trying to get all of my contacts organized so it's easier to make sure everybody gets an invitation.) I had some of the new product to show, and I had a fun, simple card for everyone to make.

I used the Buzz and Bumble paper pack. Even though it isn't as 3D like most of my other cards, I still really like it. I used the chicken wire background stamp from the Distressed Backgrounds set. I really like this stamp set. I didn't use a block to stamp it. I wanted it to fade in and out in spots even more than they already do in their design, so I used my fingers as a block. :o) The only ink I used was Cocoa. I stamped with it and I distressed all of the papers with it.
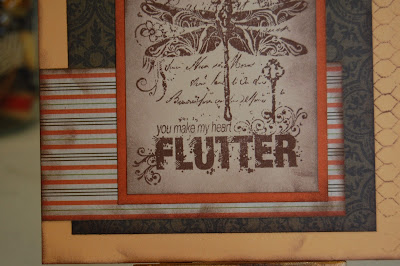
The main stamp set I used was a Quick Cards set called Dragonfly. I really love the saying on it...'you make my heart flutter.' It seemed like the perfect card to share with you on this day of love and friendship. :o)
Happy Crafting!!!
Cherri
Subscribe to:
Posts (Atom)